
Azure Blob Storage is a convenient place to keep files in the cloud but accessing them through the Azure portal is not always practical when you work with the same files regularly. Mounting Azure Blob Storage in File Explorer can significantly streamline workflow, save local storage and provide seamless file management. Mapping Azure Blob Storage as a Windows drive enables users to work with cloud-stored files like local files.
In this guide, we will show you two ways to mount Azure Blob Storage in File Explorer. The first method uses a manual setup for users who prefer a free and configurable approach. The second method uses a dedicated cloud mounting tool that simplifies the setup and allows you to access Azure Storage through a familiar Windows interface.
Table of Contents
- What is Azure Blob Storage?
- Benefits of Mounting Azure Blob Storage in Windows File Explorer
- How to Mount Azure Blob Storage in File Explorer Manually?
- How to Mount Azure Blob Storage in Windows File Explorer?
- Things to consider Before Mounting Azure Blob Storage
- Conclusion
- Frequently Asked Question
Before moving ahead, have a glance at a user query on how to mount Azure Blog storage in Windows File Explorer. Here a user asked this query on Microsoft community to get a solution. If you have a similar question, this blog will cover the two best ways to map Azure Blob Storage as a local folder on Windows in a reliable manner.
What is Azure Blob Storage?
Azure Blob Storage is Microsoft’s object storage service for storing unstructured data such as documents, images, videos, backups, logs and application files. Data is organized into storage accounts, containers and blobs. Unlike a traditional Windows disk, Blob Storage does not behave like a normal file system by default.
Benefits of Mounting Azure Blob Storage in Windows File Explorer
Mapping Azure Blob Storage as a Windows drive makes it easier to access and handle cloud-based files from a Windows computer. Among the major benefits are:
- Easy Access to Cloud Files: Mount Azure Blob Storage and browse files directly from Windows File Explorer. You can browse, copy, move, rename and manage files without having to open the Azure portal each time.
- Works with Local Apps: When mounted as a drive, Azure Blob Storage can be accessed from applications that work with standard Windows folders and drives. This can be useful if you edit, process or manage files on the cloud.
- Save Local Storage Space: Rather than keeping every cloud file permanently on your Windows computer, you can access data stored in Azure when you need it. This can be useful when working with large amount of data or when local disc space is limited.
- Easy Regular Access: For those who work with files in Azure Blob Storage often, mounting the container as a drive gives you a familiar way to access it. File Explorer is available to open and access the cloud storage in addition to your other Windows drives.
How to Mount Azure Blob Storage in File Explorer Manually?
Windows does not provide a native option to directly map an Azure Blob container as a standard network drive in the same way it maps an SMB share. Therefore, a third-party filesystem or cloud-storage client is required to mount Azure Blob Storage as a local drive on Windows. One common approach is to use a tool such as rclone with its mount functionality.
Step 1. Install rclone
Download and install rclone on your Windows computer. After installation, open Command Prompt or PowerShell and check that rclone is available:
rclone version
If the command returns the installed version, rclone is ready to use.
Step 2. Configure Azure Blob Storage
Run:
rclone config
Create a new remote and select the Azure Blob Storage option.
You will need information such as:
- Azure Storage account name
- Storage account key
- Container name
- Remote name
Follow the prompts to complete the connection.
Step 3. Test the Connection
Before mounting the storage, check whether rclone can access your container:
rclone ls azure:container-name
Replace azure with your configured remote name and container-name with your actual container. If the command lists your files, the connection is working.
Step 4. Mount the Container
Create a folder such as:
C:\AzureBlob
Then use the rclone mount command:
rclone mount azure:container-name C:\AzureBlob
Now, the container will be accessible through the specified Windows folder.
Limitations of Manual Method
rclone is powerful, but this approach can be less convenient for users who prefer a graphical interface. In this method, you may need to:
- Configure the Azure connection manually
- Work with command-line
- Configure mounting options
- Manage authentication yourself
- Troubleshoot connection or filesystem issues
How to Mount Azure Blob Storage in Windows File Explorer?
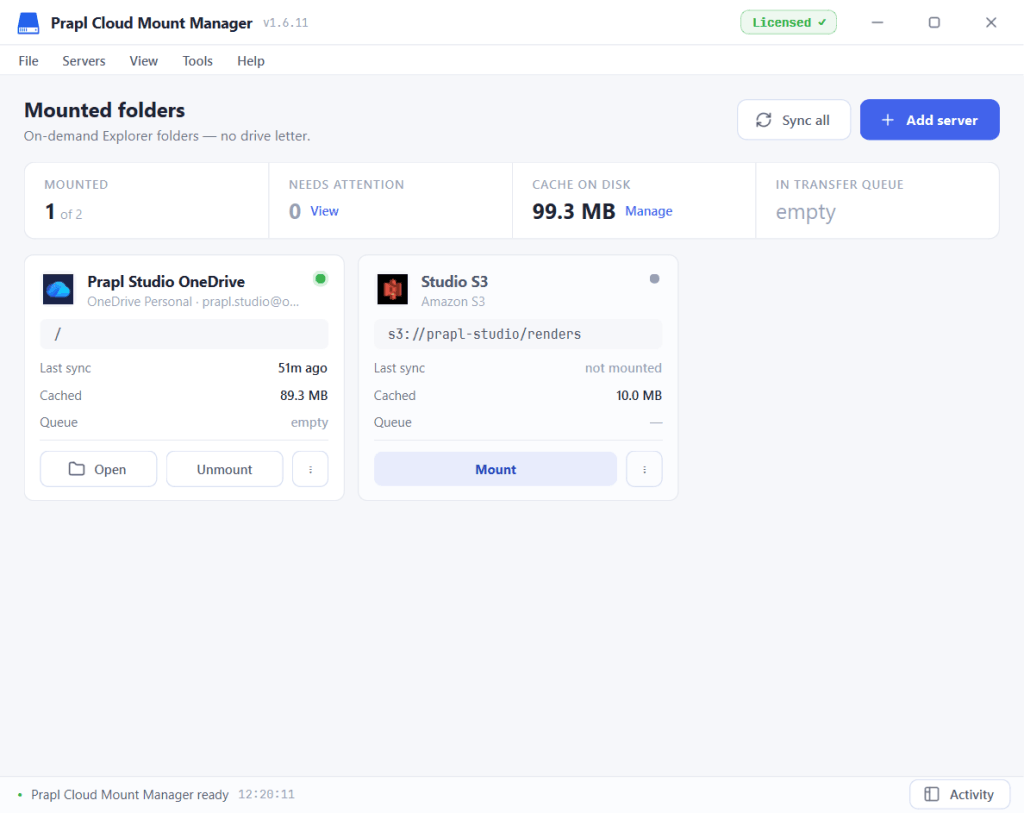
If you want a simple solution for mapping Azure Blob Storage in File Explorer, then use the Prapl Cloud Mount Manager on your system. It provides a graphical interface for connecting cloud storage and making it available through Windows. The software can mount Azure Blob Storage as a local drive without configuring commands.

Steps to Mount Azure Blob Storage in File Explorer
1. Launch the tool on your Windows Pc and click on Add Server.
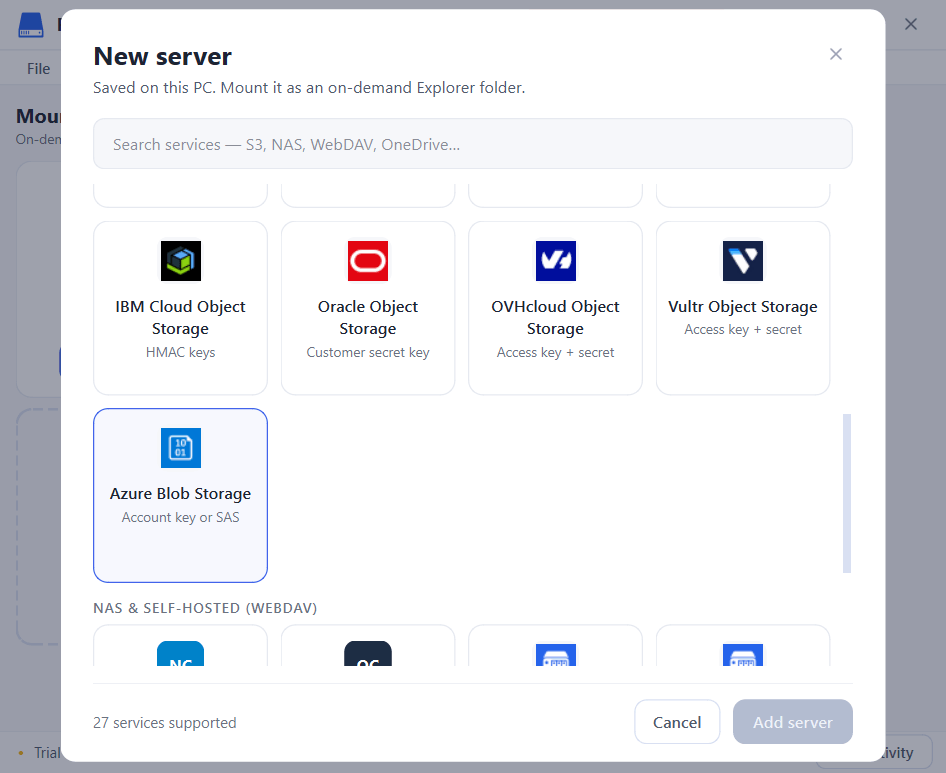
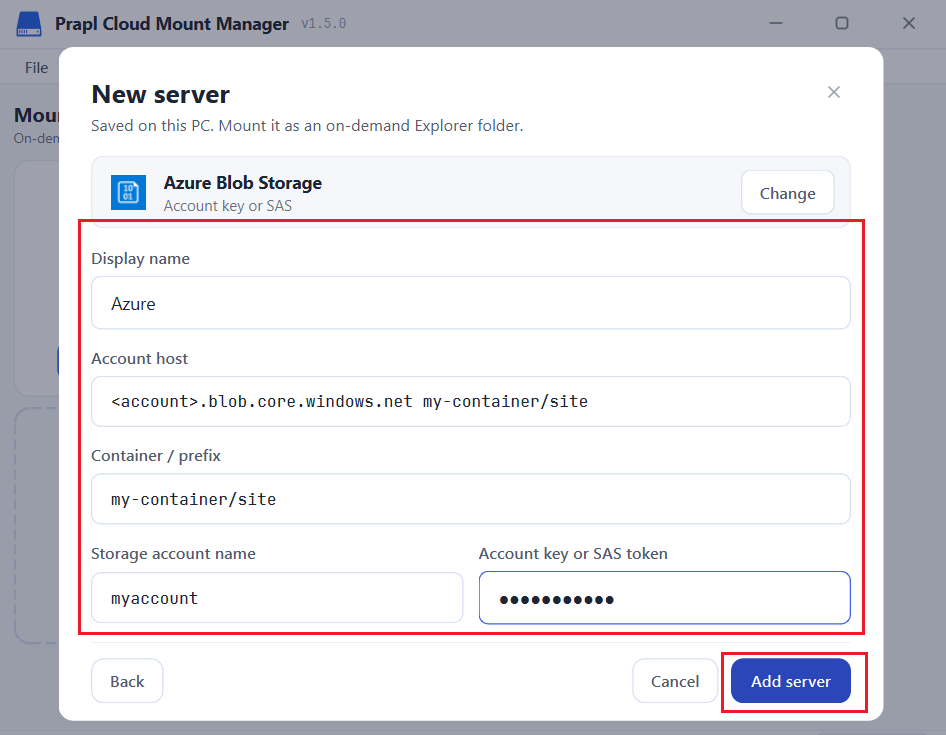
2. Choose Azure Blob Storage from the available options and click on Add Server.
3. Enter your Azure Blob Storage cloud access key and other details to add it.
4. Once added, click on Mount.
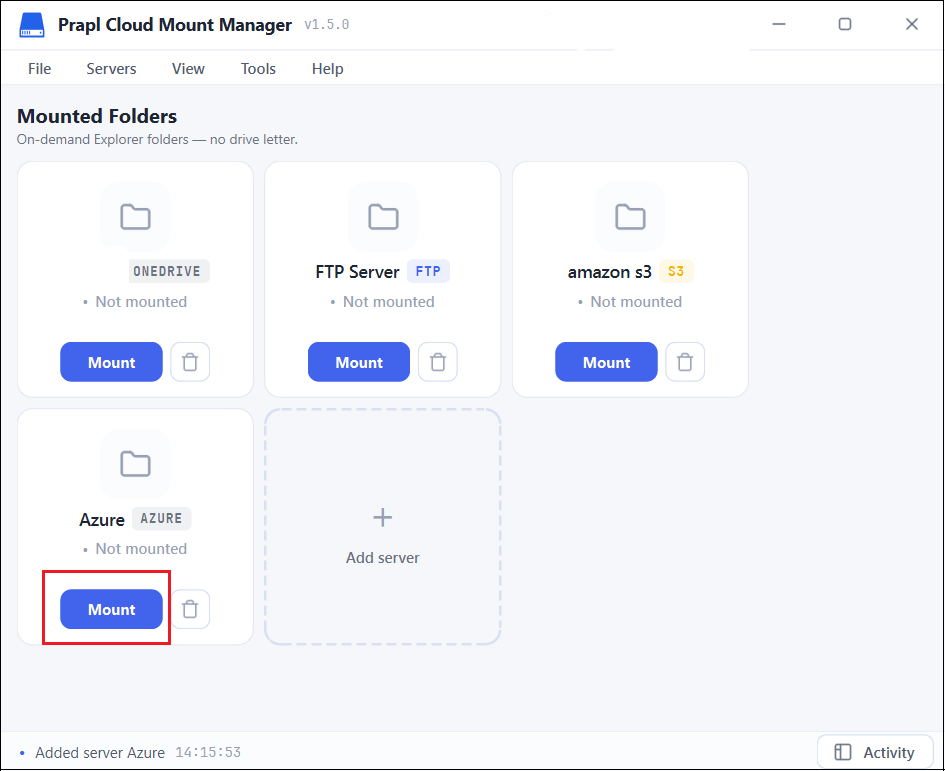
Now, Azure Blob Storage will appear in Windows File Explorer.
Things to consider Before Mounting Azure Blob Storage
A mounted Azure Blob container can make file access easier but there are a few things to keep in mind.
- Internet Connection: Cloud files are accessed over the ineternet, so performance depends on network speed and latency.
- Permissions: Use appropriate Azure permissions and avoid giving users more access than they need.
- Large Files: Uploading or opening large files can take longer than working with files stored on a local SSD.
- Caching: Some mounting tools provide caching options. Configure them carefully because cached files may consume local disk space.
- Security: Protect your Azure credentials and use secure authentication methods whenever possible.
Conclusion
Mapping Azure Blob Storage as a Windows drive improve file access, saves local storage and enhance workflow. You can manually mount Azure Blob Storage in File Explorer with rclone, if you prefer a command line solution or use a professional tool simple setup. Both methods are workable and helps you to access Azure Blob Storage in Windows File Explorer.
Frequently Asked Questions
Q1. Can I use Azure Blob Storage locally?
Ans. Yes. You can access Azure Blob Storage from a Windows computer and work with cloud files like local files.
Q2. Do mapped Azure Blob Storage consume local storage?
Ans. Only downloaded files use local storage. Online-only files appear without takinh up space.
Q3. Can I disconnect a mounted drive?
Ans. Yes. Right-click the drive in File Explorer and select Disconnect.
Q4. Can I map Azure Blob Storage as a network drive?
Ans. Yes. Azure Blob Storage can be mounted as a Windows drive using rclone or cloud mounting software.
Q5. Is an internet connection required to access files on a mounted drive?
Ans. Yes, an internet connection is required to access files stored online. Offline files can be edited and will sync automatically when you reconnect.